A private dedicated server can redefine your experience of exploring the rich world of Core Keeper.
Building your world and navigating the game’s vast caverns is so much more fun with friends, especially on your own terms. A stable connection can be the difference between a fun experience and a headache traversing the Core.
At Hostari, we believe that starting your own dedicated Core Keeper server should be as simple as possible. That’s why we offer affordable, easy-to-use dedicated server hosting for Core Keeper players.
In this article, we’ll explain how to set up your own dedicated server. We’ll also share some of the most important things to look out for when it comes to server hosting providers.
What is a Dedicated Core Keeper Server?
A dedicated server is a server that is completely yours. They allow you to play the game as you choose, with the ability to unite you with other players to enhance your experience. You can tweak the server to your own liking, meaning that the limits of the game are truly in your hands.
In the vast sandbox of Core Keeper, a dedicated server is crucial to expanding your experience to its maximum.
How to Choose the Best Hosting Solution for You
Choosing the right Core Keeper server hosting is crucial. Here are some key considerations to make when choosing the perfect hosting provider:
Performance
Depending on the hardware and location, different providers offer different levels of performance.
It is generally better to connect to a server closer to you since a server further away has lower performance. In addition, a service with more hardware power (RAM, CPU, etc.) will generally perform better.
With Hostari's high-performance servers, you have superior connectivity everywhere you want to go with exceptional ping across all of the USA & Canada.
Additionally, our servers have a minimum specification of 128GB RAM and i9 9900K processors. Travelling around the Core has never been so smooth and responsive!
You and your friends should also be able to play whenever it is convenient to do so, especially since the main reason for Core Keeper’s dedicated servers existing is so friends can access their joint games without the need of the owner to be playing. Excellent uptime is a sign of a competent provider.
User Experience
Easy-to-use interfaces and exceptional support elevate hosting providers. A good customer support team can help guide you through any difficulties, and make sure that your server is running as best it can.
An easy-to-use control panel makes it easy to set up and run the server, so you can spend more time playing instead of setting it up.
Hostari offers superb 24/7 support, so you can always get help setting up your server. Additionally, Hostari's control panel simplifies the process, requiring no command line knowledge.
Pricing
A good hosting provider should offer good value. It’s best to find a hosting provider that is upfront about their pricing and won’t surprise you with hidden fees or charges.
Long-term contracts from providers are usually a bad deal, locking you into contracts that may be difficult to break.
Look for a provider like Hostari that lets you pay monthly without committing long-term. By doing so, your plan will be flexible and tailored to your needs.
You can try Hostari's service for free for 24 hours. Then, once you decide whether we're a perfect match, you can opt to move to one of our services. Until then, no fees, no card required, and your friends can join you in your journey too!
So, why not try out Hostari now and see if it’s right for you?
How To Rent And Set Up Your Own Dedicated Core Keeper Server
Renting a Core Keeper dedicated server is fast and simple. In just a few steps, you can be exploring the caverns of the Core with your friends. Here’s a guide:
- Go to the Core Keeper dedicated server hosting page.
- Pick a plan that suits you, and sign up.
- Follow the server wizard to set up the server.
- In the Core Keeper main menu, click “Join game”.
- Copy your Game ID from our control panel and paste it into the text box.
- Press enter, and you’re in!
How To Set Up Your Own Dedicated Core Keeper Server
Setting up a Core Keeper server can be hard and tiresome. However, we’re here to lend a helping hand. Here is a step-by-step guide for setting up your own Core Keeper dedicated server.
- On Steam, go into your Steam Library.
- Click on the “GAMES” dropdown, and check “TOOLS”.
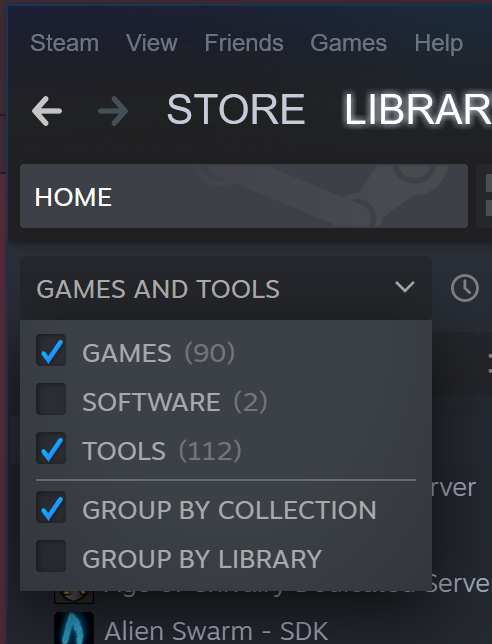
- Search for the “Core Keeper Dedicated Server”. Right-click and install it.
- Once installed, launch “Core Keeper Dedicated Server”
- On the pop-up that appears, make sure “Launch Dedicated Server” is selected, then press “Play”. This will open a command prompt window, which will generate a Game ID for you. Make a note of this Game ID, as you’ll need it to connect.
- Your server is now running!
Do not close the command prompt window, as that will leave the server active until you next restart your computer.

You and your friends can go ahead and join your server by entering your Game ID into the “Join Server” selection on the main menu.
When you’re finished running your server, go back to the command prompt window and press “q”. Then, close your command prompt window.
Host your own Core Keeper dedicated server with Hostari
That’s why Core Keeper dedicated servers are useful and how to set one up on your own computer. With this, your Core Keeper experience can be truly in your control.
If you’d like to avoid the stress and tedious process of installing your own server, Hostari is here to help.
Our dedicated servers are available to rent and are completely flexible with no strings attached, so you can walk away if you’d ever like.
With 24/7 support, powerful servers, and a 24hr free trial with no credit card needed, why not give us a shot today? Get started now!